Designing a Custom, Modular Phone Holder for the Samsung Z-fold 2 with Spigen Case
With the Samsung Z-fold 2 in hand, the hunt for the right car phone holder became a personal project. Dive into my journey of crafting and refining a custom, 3D-printed phone holder specifically tailored to the Samsung Z-fold 2 wrapped in a Spigan case.
My wife and I are lucky enough to both have a Samsung z-fold 2, one of those foldable mobiles that open up into a mini tablet. Personally, I love it, but one downside is that the protective cases available for this specific device are rather limited. Eventually, after trying various options, we both ended up with Spigen cases, which add considerable protection at the cost of considerable bulk. Unfortunately, this means that the available car phone holders are usually too small or too flimsy for us. And so, last year, I designed and printed my own.
As you may be able to tell from the images below, I was fairly inexperienced with printing when I made these, and the printer itself wasn't very well dialled in. Nevertheless, the holder worked really well. The tolerances were tight, and so the phone slid easily into the holder itself without any extra space to rattle around in the car. Perhaps my favourite feature though was that the wire holder at the bottom fit and held a USB-C cable at exactly the right height so that it would automatically enter the phone's port and connect to the car's android-auto system, meaning I no longer had to plug my phone in manually.


Challenges with PLA Material in Hot Conditions
Increasingly Hot Weather:
There's one major downside to these self-made prints though - the PLA plastic I usually use in my prints cannot hold up to high temperatures. That's usually fine for indoor applications. However, the UK has been facing more and more heatwaves these past few summers, and this means that on the truly hot days, the internal temperature of our black car can reach temperatures above the glass transition temperature of PLA, at about 50°C to 60°C (122°F to 140°F), causing it to become soft and pliable. Basically, my holder kept on melting on hot days, causing the male end of the USB-C cable to no longer connect to the phone, or the borders of the holder to sag inwards and prevent the phone from sliding to the bottom.
Over the last year, I've either been too busy to address the melting issue, or I'd forgotten about it once summer was over. Recently however, my holder once again melted, right on the day my wife and I were to take a long drive down to Gatwick airport to start our holiday. This failure, right at a time I really needed my navigation system to be reliable, was unwelcome to say the least. And so, I decided to address it as soon as I got back.
Thinking about the original design and what I would like to do differently, I saw 3 areas that I'd like to improve.
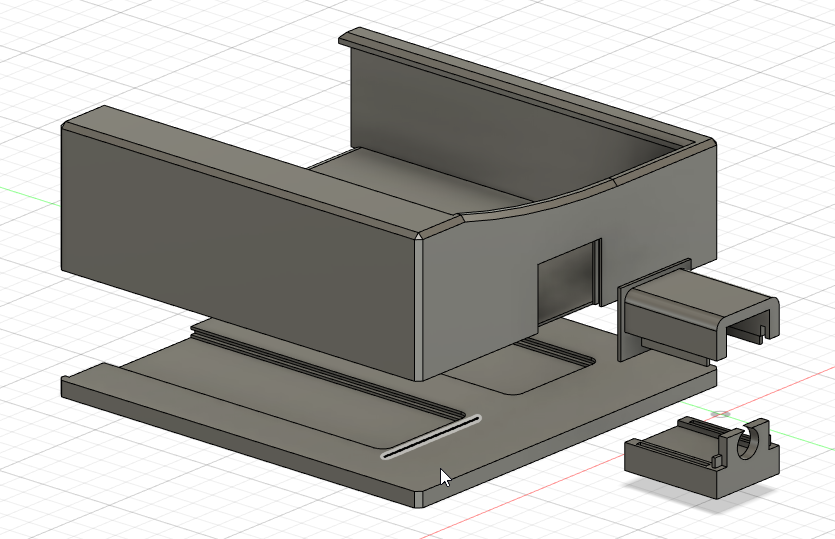
Adding a Mount-Supporting Base-Plate:
Firstly, regardless of how well I make this new design, I still expect that I'll have to change the phone holder in the future, and I'd like to make the process a lot easier. Currently, I attach the holder to the car using some double-sided 3M tape, which is very strong and reliable but is a pain to detach from the car. Every time I've had to replace the holder, I've had to use a credit card or something similar to slowly saw away at the tape behind the holder without damaging the car. It takes a lot of elbow-grease and I feel like I'm going to scratch up the interior every time I do it. Instead, I'd like to make a more permanent 'base-plate' onto which different holders that I design in the future can slot onto, making it a simple case of sliding the main body of the holder up and off of the base-plate if I ever want to swap it out.
As a proof of concept, I printed off some small squares of plastic with central protrusions for the male parts, and corresponding grooves for the female parts. From previous designs I've made that had snap-fit connections, I knew I needed an additional total clearance of about 0.15mm between the male protrusion and female grooves in order for the parts to fit together. However, I want these to easily slide against each other while still holding firm when no force is applied. Thus, I designed the first male piece with 0.1mm clearances on all faces of the protrusions (0.2mm total). This resulted in a male-female pair that very firmly stuck together, but was near-impossible to separate. A second attempt with 0.2mm on each side gave me an easy-sliding pair, but with a tiny bit of space for wiggling. I decided that, instead of reducing the clearance to stop the wiggling, I would instead use two pairs of these connectors and lengthen them so as to maintain the easy 'slide-ability' while reducing the likelihood that the holder would rattle as I drive.


Improving the USB-C Holder:
Secondly, the most common point of failure on the original holder is the USB-C cable. If the connector moves even a fraction of a millimetre, the phone no longer easily connects, requiring some jostling and force to be applied to the phone to join the two, which isn't ideal. Additionally, wires seem to fail every now and again for whatever reason, meaning I have to replace them with wires that don't necessarily have the same dimensions. Lastly, these wires are usually a pain to actually fit into and take out of the original design. Thus, since I'm making a modular slotting system for the base-plate of the holder, I figured I may as well make the wire-holder modular too so that I can easily remove it and swap out the wire without printing a whole new holder.
This was by far the hardest part to get right. I started off by extending the original cable hole so that it extended all the way down towards the base-plate. I then added grooves to the sides and a corresponding 'male' square piece of plastic that would slot into the hole, this time with a clearance of 0.15mm on each side so that it would more tightly fit and be less likely to move around. This worked perfectly, and acted as a proof of concept - the base-plate and grooves holding the little 'male' square in place.
Next, I extended the square out to form a box long enough to hold the wire, and split the box into separate parts. This is where I made a few mistakes. The first design was made to a good accuracy, but because the wire needs to first be inserted into the box before it can be pulled through far enough to connect to the phone, I failed to consider how to actually get the wire inside.
To get around this, I separated this bottom piece into 2, with the back part being removable, slotting in and out just like the other pieces I mentioned. Ultimately though, I did away with this design as it was far too brittle, snapping regularly, and also it was very fiddly to install.


After a few iterations, I ended up with a two-part design. On the bottom piece, female grooves ran down the sides (0.15mm clearances again), and short male connectors ran up the back, joining onto a small back plate that held the wire in place. This allowed the wire to easily be attached. The top piece contained the slotting mechanism that fit onto the phone holder, as well as the wrap-arounds that encased the wire and connected onto the bottom piece. Thus, the top piece would first be inserted into the holder. Then, the wire would be inserted into the bottom piece. The wire would then be threaded into the holder. Finally, the top and bottom pieces would be snapped together.


Transitioning from PLA to PETG for Better Heat Resistance:
Lastly, PLA isn't going to cut it. There are various other 3D printing material options I could use that have higher heat tolerances, such as ABS, PC, and PETG. The first two would require me to modify my printer though, which I haven't got time to do at the moment, and so I've chosen to give PETG a go. PETG is a little more difficult to print with, requiring higher temperatures and a more in-depth understanding of the print process than PLA in order to reduce some of the common issues that can arise such as stringing and warping. It is also prone to absorbing moisture, which makes it tricky to use in humid environments. The reward for overcoming that difficulty though is a higher heat resistance and stronger parts (less brittle).
Unfortunately, my first spool of filament seems to be extremely wet judging by the violent popping sounds coming from my extruder. The popping seemed so violent that it completely wrecked my first attempt at printing.

Temporary Solutions and Future Plans
For now, I've got my spool sitting in a filament drying box I made , which will hopefully lead to a better second attempt. In the meantime though, I've run out of free time to spend on this project. Until I get the chance to continue, we'll be making use of the PLA test prints, which came out far better than I could have asked for. The slotting mechanisms for the wire box and the base-plate work just as I'd hoped (after making the base-plate thicker to avoid some of the temperature warping), and the wire connects immediately with the phone with no force required. In the future, I'll update this post with some pictures of the finished PETG holder, but for now, the PLA holder is working great!

